
Do you know what makes TikTok, YouTube, and Instagram so special? The interface? The features? Definitely not. They are the content creators. They are the soul of the largest digital platforms in the world.
That's why Pareto has launched one of the biggest innovations in the world of Artificial Intelligence. Now, users can create and publish their own AIs on Tess AI without needing any coding skills, and in just a few seconds! All of this is connected to the top AI platforms.
In this tutorial, you will be guided step by step to start shaping the future of technology and sharing your creations with a growing community of over 150,000 users. It's time to unlock your creative potential and turn your ideas into reality with Tess AI.
Quick Navigation
Creating an Idea
Creating a Text Model
1 – Detailing the Model
2 – Defining the Inputs
3 – Inserting Steps
4 – Finalizing the Prompt
Review
Creating an Idea
The prompt (command used to communicate with the AI) is the central part of your template. It will dictate what will be created. Therefore, in the initial step of structuring an idea, we will start with it.
Let's say you have an idea that could make life easier for those thinking about starting a business but do not know where to start.
To do this, we will make a simple command for the AI, which will still be validated, but for testing and experimentation purposes.
So, the example prompt (focused on the idea we had) would look like this:
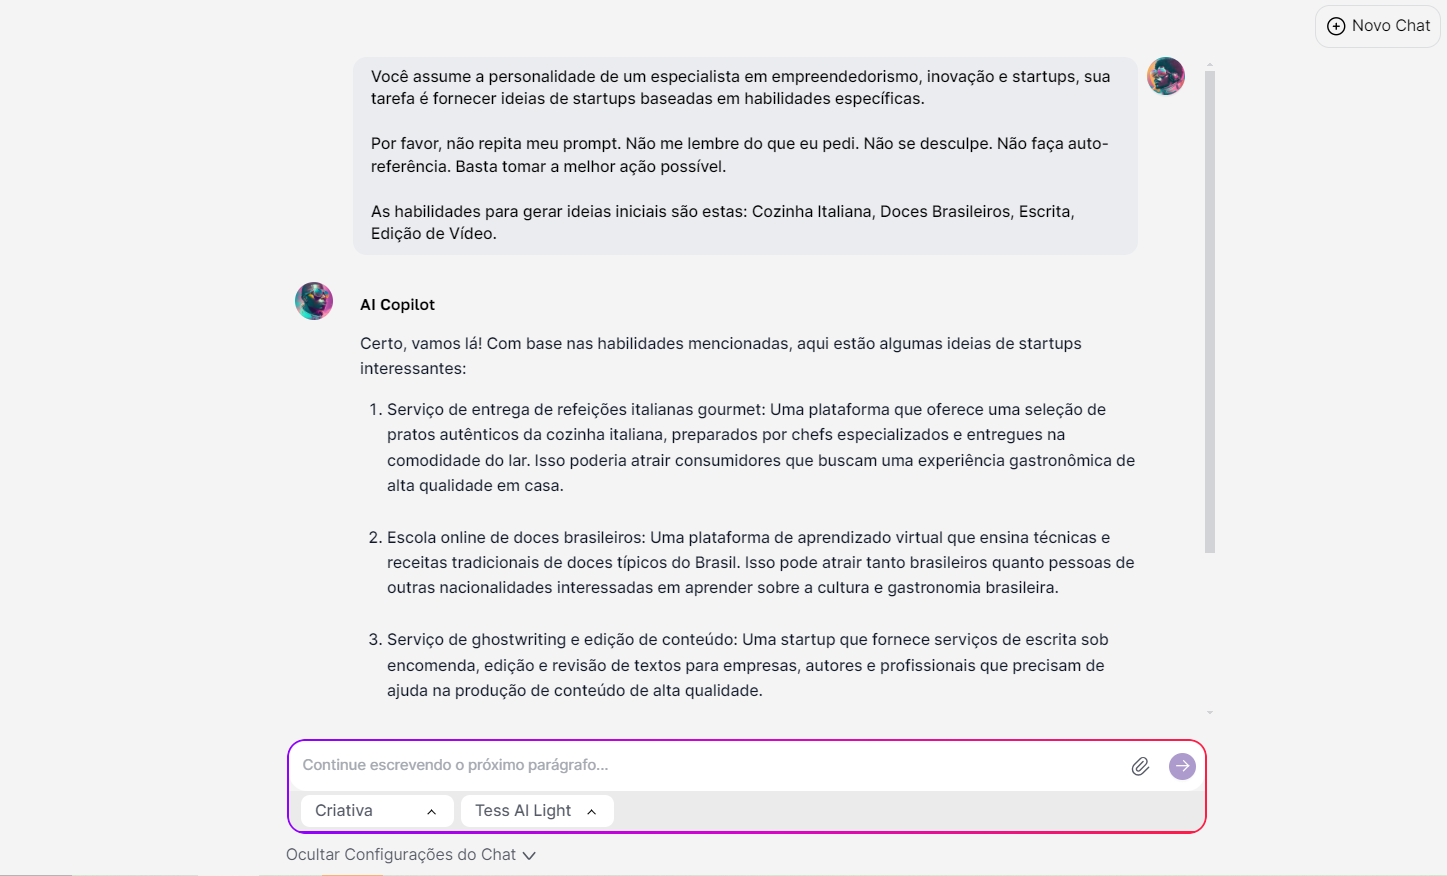
"You assume the personality of an expert in entrepreneurship, innovation, and startups; your task is to provide startup ideas based on specific skills."
"Please do not repeat my prompt. Do not remind me of what I asked. Do not apologize. Do not make self-references. Just take the best possible action."
"The skills to generate initial ideas are: Italian Cooking, Brazilian Sweets, Writing, Video Editing."
Test Your Prompt with Tess
With your initial prompt in hand, simply test your idea with the help of Tess AI. To do this, click on "AI Copilot" in the Sidebar.
After that, enter the prompt you developed. If necessary, you can change the AI Model used or its creativity level.
Check if the responses that Tess provided for your prompt were satisfactory. If not, it will be necessary to refine.
Refine the Logic Behind the Template
The prompt in this case was satisfactory, but we could limit the number of ideas for this response and even leave it open for the user to define how many ideas they want.
Thus, the new prompt will be:
"You assume the personality of an expert in entrepreneurship, innovation, and startups; your task is to provide startup ideas based on specific skills. Please do not repeat my prompt. Do not remind me of what I asked. Do not apologize. Do not make self-references. Just take the best possible action."
"The skills to generate initial ideas are: Italian Cooking, Brazilian Sweets, Writing, Video Editing."
"The number of ideas will be: 10."
After refining, remember to test again with Tess AI to ensure that the logic really works. As you can see, Tess AI generated 10 ideas based on the skills.
Creating a Text Model with Tess AI
Knowing that the prompt is functional, it's time to bring a model to life; thus, the first step is to access your models area in the “AI Studio” menu.
These initial steps are identical for creating both text and image templates. Therefore, click on “Add model” and start creating your custom template.
1 – Naming the Model
At this stage, you should choose the model name, select the type, and the AIs used. If you are considering publishing it later, we suggest you think of an eye-catching title with keywords to facilitate the search.
2 – Defining the Inputs
This is the stage where we create the fields that users must fill in. In this case of the prompt, they are the “Skills” and the “Number of Ideas.”
Remember that you can test other types of inputs in your template; just select what best suits your project.
See the options:
Short Text: By selecting this type, you allow the user to type short texts for more objective answers.
Long Text: With this input option, you enable the possibility for the user to insert large blocks of text if your template requires a greater volume of information.
Dropdown: If you want to limit the user's response to one option from a list, simply input each of them separated by commas in the input description.
Multiple Choice: Now, if you do not want to limit the user's response, create a list of options, inserting each of them separated by commas in the input description. They will be able to choose more than one option.
Upload File: This type of input is aimed at templates involving files. It will work very well for the insertion of audio files. Try, for instance, creating transcription templates with advanced AI steps.
3 – AI Steps (optional)
If you choose to create more comprehensive templates that require analysis or something similar, you can use AI Steps. However, if this is your first time creating a model in Tess, you can skip to the next item.
You can define the category and type of step, delimiting among numerous available options. Here are some examples and their applications:
App Integration: This option provides integrations between various platforms with Tess AI, from CRM platforms to paid media, calendars, and spreadsheets.
AI Audio Transcription: Analyzes an audio file to transcribe its content.
Document Processing: Allows the insertion of PDF documents for analysis and training of the template.
AI Image Generation: Includes image generation as one of the preliminary steps of your template.
Pareto is continuously bringing more connections so that the sky is the limit in building your automations. All these steps will be elaborated on more comprehensively in another article.
But for the creation of this simpler template, it won't be necessary to add other steps. Therefore, you can click the red icon to remove the step (if you added it).
4 – Finalizing the Prompt
This is the final step in creating your AI model, where you will place the command that the AI should execute.
The Inputs created are the elements that the user typed earlier (in the input creation phase) and will appear between "**" right below the text field, as shown in the image below. If you used the AI Steps, they will also appear here.
Thus, simply insert the tested Prompt and replace the created Inputs in the respective parts of the prompt.
Note that if you don't use the Inputs within the Prompt, what the user types in the Input Fields will not be used. So ensure that it is filled in exactly as shown in the “Input Fields” box, including the **asterisks**. To make it easier, you can click on the inputs that appear just below the text box. This way, they will be added automatically.
Review
After the model creation, it will appear as a draft in your templates list. If you decide to publish it, it will go through a review by the Pareto team who, if no discrepancies are identified, will approve your template for use.
But you can use and test it while it is under review. Just click the link that will appear as soon as you save your creation.
The sample template for this article ended up looking like this:
Try Creating Your Own AIs
This tutorial marks the beginning of your journey with Tess AI. Now you are equipped with the skills to design your own AIs and automations, connecting to leading platforms like ChatGPT, Llama, Bard, Dall-E, and MidJourney.
Keep exploring and collaborating with our growing community of over 100,000 users. Your creations have the potential to stand out, and soon, you will be able to monetize every time someone uses your AIs.
Don’t forget to follow our updates and resources as we continue to expand new possibilities. Thank you for choosing Tess AI as your partner on this exciting journey!
_
Don't have an account? Try Tess AI for free.
Want to know how to create image templates? Access the article: Create Your Image AI with Tess AI.